Introduction
Re:Cap:
In the last post we discussed how to create git branches and how they can be used to create topic branches. We discussed how separating out branches into feature slices and creating a minimum viable product design can help progress development projects.
BLUF (Bottom line up front):
This post we will continue the trajectory of the workflow we started in the last post using branching and will discuss how to merge back the features we branched off. First, we will go over the different types of merges within git. We will then discuss a workflow strategy that involves separating untested code from tested code. And finish by learning how to use diff as well as the patch modifier to the add command selectively add content in the event of merge conflicts.
The merge command.
What is the git merge command?:
The merge command is the opposite operation of the branch command in that the merge command takes the commit pointer and snapshots from the branch selected and adds them onto the git history of the branch that is currently checked out/currently tracked.
This is done by making a merge commit. The merge commit is a commit on a branch that contains only the content merged in from the branch as well as any of the history from the branch itself.
There are only two types of merges in git, a “Fast-Foward Merge” and a “Three-Way Merge” git automatically selects a merge type based on the history of the branch that is being merged and the branch that is being merged into.
Git additionally has a feature to notify users of merge conflicts. A merge conflict is when the changes made to a single file from two different histories diverge and there is a need to select one set of changes or another. Users can additionally use the patch command to select some changes from one commit, and other changes from another commit. They can additionally use the –ours, –theirs or –base flags to choose between three versions of a merge conflicted files
A basic git merge
The most basic way to issue the merge command is below
- First checkout the branch you would like to merge into
- Second type the merge command and specify the branch you would like to merge into that branch
- Resolve any merge conflicts.
- Use the git add command to add the version of the file with merge conflicts resolved
- Recommit the file as a merge commit.
This flow looks like this:
$ git checkout <branch-1>$ git merge <branch-2>$ vim <merge conflict file>$ git add <merge conflict file path>$ git commit -m "Merge commit to fix MERGE CONFLICT"
But have you heard about git fetch?:
This is a good time to tell you that if you have been using the git pull you are already using a version of merge without even knowing it.
Namely a git pull is a git fetch command and a git merge command rolled into one command. But wait a minute what is git fetch.
So,what is git fetch? Git fetches retrieves the pointer from a remote repository. Git fetch only retrieves the pointer to a snapshot it does not copy the files itself into your working directory. Namely the git fetch command is used to retrieve where the current HEAD pointer is in a given branch.
The command looks like this
$ git fetch origin <remote-branch-name>
So why is this useful? It allows you to update the pointer in your repository so that the local repository can use pointer information to perform other operations such as a git checkout -b operation to create a new branch using the pointer from remote (Chacon & Straub, 2014). The fetch operation is safe so if you have a merge conflict in your local branch you can safely fix the issue without overwriting changes in your local repository (Chacon & Straub, 2014).
In fact, the git site itself recommends using a ‘git fetch’ and ‘git merge’ operation to synchronize with a remote repository as opposed to a git pull operation for most team-based workflows (Chacon & Straub, 2014).
What is a “Fast-Forward Merge”:
Earlier we mentioned the “Fast-Forward Merge”, so what is it and what does it look like.
The Fast-Foward Merge is a merge that takes place when the changes in the branch being applied can be directly reached by following the git history or ‘git log’ to the commit that is being merged.
A diagram of this is below:
Figure 1. A diagram of a git merge using fast forward. The commit from the docs branch is applied directly to the main branch.
When a fast forward merge is applied to a branch the branch simply advances the commit history of the branch that is currently checked out as if the commit on the separate branch was directly applied to the checked-out branch (Chacon & Straub, 2014). This is the simplest type of merge because it is less likely for a merge conflict to be introduced by a change implemented already on the branch which the merge is being applied. Below an example of a fast-forward merge applied to the docs section the Comics Pull List repository we talked about in the previous post.
An important note about Fast forward merge is that a fast forward merge can only occur if the commit on the separate branch can be directly reached by the latest snapshot of the branch that is being merged into. This means if a branch was created work was done on the branch while simultaneously work was done on the branch is was merge from the branches are said to have diverged. When the branches diverge a three-way merge is necessary. This important to note when working in teams if another team member is working on a separate branch and that work may have progressed the branch that you plan to merge into.
What is a “Three-Way Merge”:
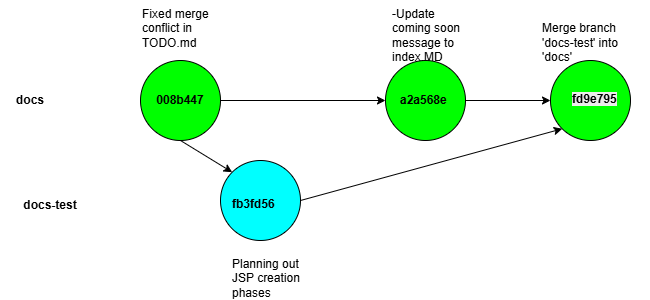
The more complex method of merging is the Three-Way merge. As noted a three-way merge happens when branches diverge. This can happen for multiple reasons but the most common reason is that you and another person who merges in changes into a branch that you planed to merge into which causes the branches histories to diverge.
Below we can see an example. In my recent development work in my docs and docs-test branch of my ComicPullList project. In the docs branch I wanted to update the main page that is accessible from the github pages site for the repository The Comic Book Repository Page: | comicPullList . In this change I wanted to update the bottom paragraph to tell users to check back for more changes. I do this by updating the markdown in the index.md file in the docs branch.
We add and commit this change by using the commands below:
git add docs/index.mdgit commit -m "Updated comming soon message on index page"
After we add our changes, we want to plan some changes to our TODO.md that we don’t know if we want to keep so we place them in the docs-test. This could also simulate another member or our repository making changes in their own topic branch and merging them into a more production ready branch. We make the changes to our todo.MD and add them using the following git commands
git switch docsgit add docs/TODO.mdgit commit -m "Planning out JSP creation phase"
A quick note about git switch and git reset:
Before we move on let’s discuss the git switch. The git switch command allows us to switch between branches in our repository. Git switch also comes with an added safety precaution. If we have uncommitted work in our current branch git switch will tell us to either stage or stash our work. This prevents us from losing work when we switch branches. Of course, if we are ok losing work, we can use the follow reset command to reset our file back to what it looked like when we first started working in a branch.
git reset --mixed HEAD~
This essentially tells git to throw away any changes we made to our file since our last commit but does not remove the file entirely. If you want to learn more about git reset I highly recommend reading Chapter 7, Section 7 of the Pro Git book. It can be found for free here: Git – Reset Demystified (Chacon & Straub, 2014)
Back to our merge example:
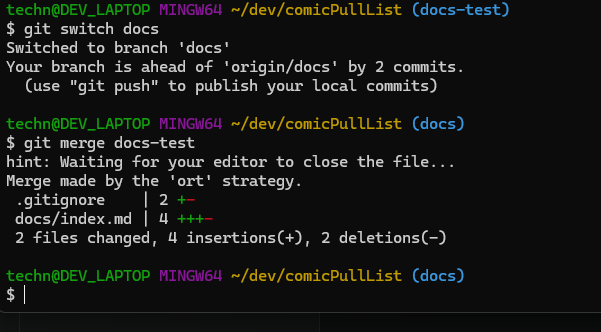
Once we are happy with the changes we can switch back to our docs branch and try to merge our changes using the following commands:
git switch docsgit merges docs-test
After we issue the merge command git will open our editor of choice to edit a merge message this is shown below.
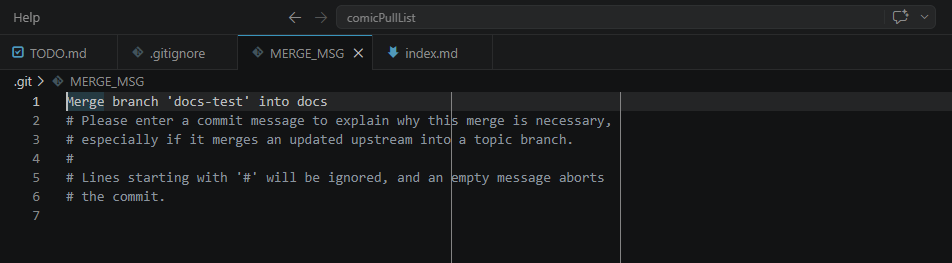
After we write save and close our merge message, we should see a response from git that states our files have been merged by ort strategy. This stands for ostensibly recursive twin strategy. This is a fancy way of git telling us it walked both branches of our git history to gather the changes..
The key difference between a three-way merge and a fast forward merge is the Snapshot created on the branch. In a Three-way merge notice how, the snapshot is a new snapshot with changes introduced from both branches (Chacon & Straub, 2014). This is because git tries to reconcile both branch histories into the git merge (Chacon & Straub, 2014).
It is good to note here that if you want these changes to be pushed up to remote, we still have to issue a git push <remote name> <branch name>. Additionally, if you want both branches to have the changes from each other you will likely have to merge the other way to. This means merging docs into docs-test. This is a common strategy used when branches are long term topic branches. When branches only stay around long enough to fix and issue and throw it away it is not too uncommon to issue the following commands to delete a branch (Chacon & Straub, 2014).
git branch -r <branch name>
This is just one common workflow recommended by the Pro Git book in the following chapter. (Chapter 5 Distributed Workflows) Git – Distributed Workflows (Chacon & Straub, 2014). In the next section I will be discussing my chosen workflow for the Comic Book Pull List repository
Using merging to separate untested changes and integrate tested changes:
In the last branch post we learned about all of the different branches I use when developing my Comic Pull List application. What we did not discuss was the workflow between each of the branches.
Commonly software teams often use branches to separate untested code from tested code. This is called development, and production. Developers like myself may even choose to use topic branches that can only be merged into main when tested. There is methods to automatically ensure all code going into the main branch of a repository passes all unit test. However, that is outside of the scope of this post.
What in want to talk about here is simply the separation of untested from tested. If you remember from the last post, we identified docs and docs-test as the following.
- docs: A set of Markdown files used to describe what is left to Todo on the project TODO.md, a description of the project README.md, how to build the project BuildInstructions.md (These are all displayed on github pages which will be discussed in a future blog post.)
- docs-test: It is usually a good idea to test Build Instructions before you tell folks that is how to build the code. doc-test is a segment of build instruction mark down that needs to be tested across several operating environments.
In this post I demonstrated merging up and down between docs and docs-test
The common workflow I use in this sense is to treat documents like code. Documents, illustrate the creation and use of an application. Just the same way that code is used to make the application itself. Because of this document should generally be treated the same way as code. If you update a feature on your TODO list check it off and merge it into your final shipped documentation. If you update how to install, test or use your application test out the use in a virtual machine or a container. Now there is also something to be said for making code that documents the creation of your code and infrastructure as well (using something like ansible for example). But that is for another post.
Because we are constantly testing out features in code, we can create a workflow that works like this:
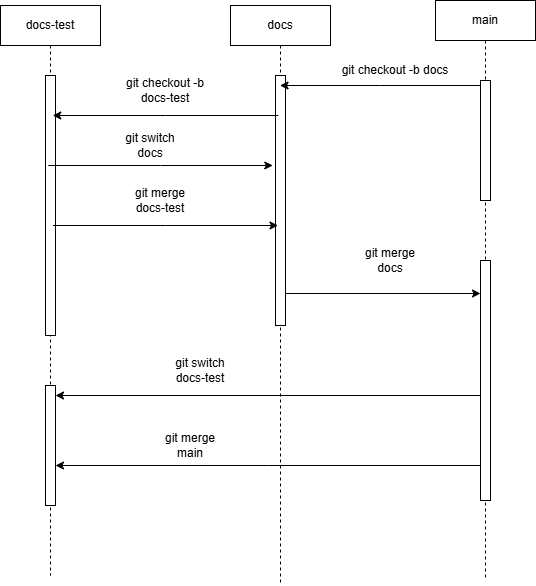
Each arrow in the above diagram represents changes to the documents being changed back and forth between untested document changes in docs-test, to tested changes in docs and released changes in main.
This workflow allows our users to understand when a change to our code or infrastructure is final. And allows collaboration to understand where we are at in our application creation process.
This holds true as well for topic branches, it is ideal to implement integration branches where multiple related issues can be pushed into to determine if a change works with our current environment. For example, all tested changes to my applications infrastructure I merge into the infra branch. Any changes to my create read update and delete features I push into my CRUD branch. This is helpful for later as well if you need to roll back a change or determine where a problem was introduced to keep all related changes together so you can determine where a change was made.
Using diff to understand changes in a file between branches:
One of the last things I would like to go over in this post is the git diff command. When we go to merge files, it is a good idea to understand what is being changed in our current branch by bringing in the new branch. This can be accomplished using the git diff command.
The git diff command can be used to compare files between two different branches. This comes in handy when you want to know what will be introduced by a merge.
If a merge will contend with changes already made in your current branch you can either choose to stash the changes in the current branch and reset or perform a manual three-way merge. All of this will be discussed into future post.
However, if the result however is only changes from the other branch and not changes from your branch you should be able to merge successfully without little conflict. It is generally a good idea to run a git diff between branches you plan to diff in order to ensure the merge will go cleanly and that you do not need to resort to advance merge techniques. While those techniques are outside of the scope of this post it is advantageous to check the status of a branch before a merge is submitted to limit the necessity of more advance merge techniques.
Below are common ways to check the difference between merged files
git diff <branch-to-merge> -- <file of concern>
While this is the most common quick. We can also get a view of our file from three different angles when merging
Ours: The file as it currently exist in the current branch
Their’s: The file as it exist in the branch being merged in
Base: The common ancestor of our current branch and the branch being merged in. Think of this as the version of the file made before a branch had occurred. If the base occurs in yet a third branch like the main branch, then the base file will be that file. This can be thought of the genesis file or the file the other two derive from
The only downside of these above definitions is they only can be seen if a merge conflict between a merge occurs which means the below sequence needs to occur
- A git merge is attempted
git merge <branch>
2. git show is run to inspect the version of the file
:1: gives us the base file
:2: gives us our current branch file
:3: gives us the branch we are merging in’s file
We inspect this using the following commands
#basegit show :1:<path/to/file> #oursgit show :2:<path/to/file>#theirsgit show :3:<path/to/file>
3. We can then directly get the differences between these files using the git diff command. For example, base vs. theirs to determine what has changed since the file we derived from.
git diff :1:file :3:file
4. If after getting this information about the merge conflict we choose not to merge we can abandon the merge using
git merge --abort
Selecting a version of a file for merging:
Above I stated that if we get a merge conflict, we can compare using the base, ours and theirs terminology. We can also resolve most merge conflicts by selecting and staging a file based on this terminology as well. To do this we need to use a combination of git checkout and git add after merging a file
For example, if we wish to complete a merge but keep our current version of a file and abandon all changes, we use the following commands
git checkout --ours -- <path/to/file>git add <path/to/file>
Likewise if we want to abandon changes from both files and just go with what we inherited from we may choose to do –base instead.
git checkout --base -- <path/to/file>git add <path/to/file>
And if we want to overwrite our current branch with incoming branches we can do the following:
git checkout --theirs -- <path/to/file>git add <path/to/file>
If a merge conflict is rather simple and does not require driving into individual parts of each file. Then this method gets the job done. However, not all merges are this simple which requires we follow more advanced merge conflict resolution. We will discussion these in the next set of blog post called “Git messy” and “git clean”
Conclusion
With that we have made a great deal of progress towards explaining the primary tools that developers use from git. As I progress writing this series I will look to explore more complex workflows. Additionally, we will look at what tools are available to developers through GitHub to make their development work, collaboration, and use by users easier for key stakeholders of our applications.
This Post:
In this post we discussed how merging works in git. I then demonstrated a common use of merging that I use in my Comic Pull List application. Finally, we demonstrated some commands we can use to determine between three different versions of our files in the event a merge conflict does occur.
Next Post:
The next post will be really fun. Next, we will be discussing the stash command. Namely how developers can partially complete their work in one branch and switch to another branch without losing their work. Or accidently make changes to the wrong topic branch and use the stash command to migrate the change to the appropriate branch within our git repository.
References:
Chacon, S., & Straub, B. (2014). Pro Git (2nd ed.). Apress. https://doi.org/10.1007/978-1-4842-0077-3


Leave a comment