
Introduction:
Bottom Line up front: This guide covers what most developers should know about git, to save and manage their work
This guide will be split up for brevity. The main ideas will be to discuss a single topic with each posting
The idea from this guide was inspired by nephew starting his college and Computer Science Journey. I wish him great journey and many successful compiles. 🙂
This particular post is going to cover version control and Git’s brand of version control at a high level.
So why use Git: Exploring Git and its capabilities
So what is Git, and why should someone use it? Git is a version control tool. Version control is a tool which maintains multiple versions of a file. For example when you have multiple different iterations of a paper you are writing, each iteration of the paper is a version. Git has many capabilities which this series of blog post will discuss. Git can
- Add files to a repository to track
- Keep a historical log of all of the changes
- Remove files that git tracks as part of version control
- Store changes locally, and store changes remotely
- Provide Integrity to versions of a file using unique commit id’s (also know as a commit hash)
- Provides integrity over who made a change to a commit using required account information and commit signing.
- Keeping track of key versions through the use of git tags. This is useful for troubleshooting.
Each of these features we will go over in later or even related blog post.
The main reason you should consider using Git is that it remains the lowest barrier way to maintain versions of files.However some additionally reasons you may choose to use Git include:
- To collaborate with others on a project
- To maintain a portfolio of projects you have personally worked on
- To compare versions of code you have worked on to troubleshoot your code effectively
So, what is version control?:
A version control system is a means of creating a series of iterations on a given file. A version control system saves files in various versions to allow the user to maintain a history of what changes occurred on a file as well as revert to a previous version of the file.

There are three types of version control: file backups, differential (or delta based) version control, and file based version control.
A file back up is as simple as it sounds. Before making a new version of a file a backup is stored. This is common practice when writing multiple versions of a paper for example. This method however takes a great deal of computer storage
A differential version control sometimes referred to as delta-based. Stores the base file as it is initially created and multiple change history files. The change history of the files are merged with each base file to create the current version of the file. This method is lighter on storage. This type of version control may require a remote version control database to keep track of the different changes that occur to a file. This is the case with products such as IBM’s ClearCase. Due to the nature of differential version control, more processing time is needed to reconstruct files from the difference files. Tools such as Subversion, CVS and IBM’s Rational Rose suite use this method just to name a few.

The third file system based approach is what Git uses. The file system approach creates a reference to a file as it is at a specific point in the files history. This is referred to as a SNAPSHOT. This type of version control falls between a differential version control system and a file back up in terms of space used and computation time needed to reconstruct a file. The file system based version control stores a complete reference to what has changed in a file since the files initial commitment to the version control system. Unlike differential version control a series of files do not need to be applied to the base file to reconstitute a file. Instead the reference to changes can be applied to the base file once, and the file will not depend on reconstructing a file from multiple differential change files.

Installations:
The following sections will get anyone looking to use Git started with installing it on their choosen OS of choice, Windows, Linux, or MacOS. For Linux, I personally use Ubuntu. If you use something different your package manager may be different but the steps will remain largely the same.
Windows Installation
Windows installation can be simply installed through the use of the git installer for windows.
To install git for Windows do the following
1. Download Git for Windows from https://git-scm.com/downloads/win (Select the appropriate installer for your CPU.) Most CPU’s are an x64 architecture. Some embedded systems and even Microsoft Surfaces take advantage of ARM64. Likely you will know if you are on a ARM64 computer.
2. Double click the executable, then accept the User Account Control prompt
3. Select the ‘Install’ button to agree to the Terms of Service for Git.
4. To Check the if git was installed correctly check the box on the installation wizard to Launch git bash.
5. Verify Git is installed by typing
git –version
Debian Distribution (Ubuntu) Installations
Linux installations of git is through your package manager of choice. I will give you the instructions for the APT package manager, because Ubuntu is my daily driver on the desktop. To install git with your own distribution, research the package manager commands for your distribution .The package name will largely remain the same
To install git via apt:
1. Open up a command prompt by either searching for terminal or using the Ctrl-Alt-T hot key on Ubuntu
2. Update and upgrade your operating system using the following combo commands. You will need to enter in your credentials assuming you have root sudoer privileges on your system
sudo apt-get update & apt-get upgrade
3. After any updates complete run the command to download git
sudo apt-get install git
4. To verify simply issue the git –version command from the terminal:
git –version
MacOS:
For MacOS, if you do not want to mess around with command line. The Git documentation states that Xcode will usually ship with a version of git. However, if you would like to install git through the terminal and you are willing to do some getting your hands dirty at the terminal do these steps. After all, the terminal is where git thrives.
1. Copy the line of code to install Homebrew ( which will be used to install HomeBrew) below. This will download a installation bash script from the brew git repository. In the spirit of never trust and always verify this same download command is available on the Homebrew website: brew.sh
/bin/bash -c “$(curl -fsSL https://raw.githubusercontent.com/Homebrew/install/HEAD/install.sh)”
2. Open terminal on your Mac.
3. Paste the command. The command will tell you what it will install prior to doing it.
4. If you do not run the command with sudo as the prefix the command will ask you for your password. Enter your password to proceed
5. After installation run the following command to install git:
brew install git
6. Note the if you are not on the latest MacOS version or within 2 version of the latest macOS version. Brew considers the machine to receive tier 3 support:
To read more about the brew tier support types go to docs.brew.sh/Support-Tiers#tier-3. This means the homebrew experience may not always be optimal, and is largely unsupported. If you have supported hardware you should upgrade your Mac to the latest version of MacOS, if not the latest version of MacOS available to your hardware.
If you choose to just use Xcode. You can simply download the latest version of Xcode from the App store on your Mac. However, similar to homebrew Mac may require that you update your operating system to the latest version prior to installing Xcode.
Git on the Mac works similar to git on a Linux distribution. To check that git is installed correctly simply issue the following command:
git –-version
Configuring Git:
Specifying essential information:
Upon first using git it is essential to specify some information using a configure command. This information git uses when making commits to a repository.
The reason for need this information will make more sense when using git for remote usage or as part of a team. It is essential to configure the following to continue using git
- Your email address you will use for git
- The Username you will use for git
Some optional things you may choose to set up
- What text editor you will use for writing commit messages
- Whether you will sign your commits, through the use of a signing key.
- Which SSH key you will use to perform remote git commands via ssh
For now we will go over the essentials of configuring your email and username and in addition set a editor
To set your user name in git use the following command
git config –global user.name “<User name here>”
To set your email in git use the following command
git config –global user.email “<User name here>”
In the next section we will discuss how to set your editor to use when writing git commit messages.
Setting up the default editor:
When choosing a default editor for git ensure you choose something you are comfortable using
Here are a few of my favorites and what they are good at
- VSCode: Best when paired with built in plugins allowing VSCode to be used as an IDE as well. VSCode has a user interface for git built in. The user interface allows users to easily handle some of the simpler git functions. However, more niche use cases for git may still need to be handled at the command line See the section Bonus Setting up source control in vscode
- NotePad++: NotePad++ has a large number of language interpreters built in allowing it to be able to provide code highlighting for many basic programming languages as well as serve as a commit message editor
- Vim: When I was in college a professor told me. Imagine you are using a remote management protocol like SSH to remotely access a system via command line. In this scenario you do not have a GUI only a shell. Vim is handy for this. However, Vim does have a small learning curve, this is due to needing to learn multiple short cuts to change to different modes when operating Vim. If you choose to use Vim I highly going through a vim tutorial such as https://www.vim-hero.com
Once you have choose and downloaded a editor.
- Retrieve the full path name to where the editor executable is install your computer for Example VSCode maybe stored on a Windows machine at C:/Program Files/Microsoft/VSCode/code.exe.
- Copy the path name
- Open a command terminal on your computer.
- Enter the following command:
git config –global core.editor “<Path to editor here>”
5. Paste the name of your editor in the command between the quotes where <Path to editor here> is indicated.
git-scm.com indicates for NotePad++ you may want to add the following agruments to Notepad++ to use it effectively with notepad++
- -mulInst
- -notabbar
- -nosession
- -noPlugin
Your configuration for Notepad++ may look like this:
git config --global core.editor "'C:/Program Files/Notepad++/notepad++.exe' -multiInst -notabbar -nosession -noPlugin"
Source: https://git-scm.com/book/en/v2/Getting-Started-First-Time-Git-Setup
Bonus setting up source control in Visual Studio Code (VSCode):
Below shows steps how to use the source control GUI window in VSCode to use git while creating projects in VSCode.
- To set up source control in Visual Studio Code (VSCode) first download and install Visual Studio Code
1.a If you are in the command line you can type the following command to open VSCode
code .
1.b Otherwise Select and double click the VSCode Icon to launch
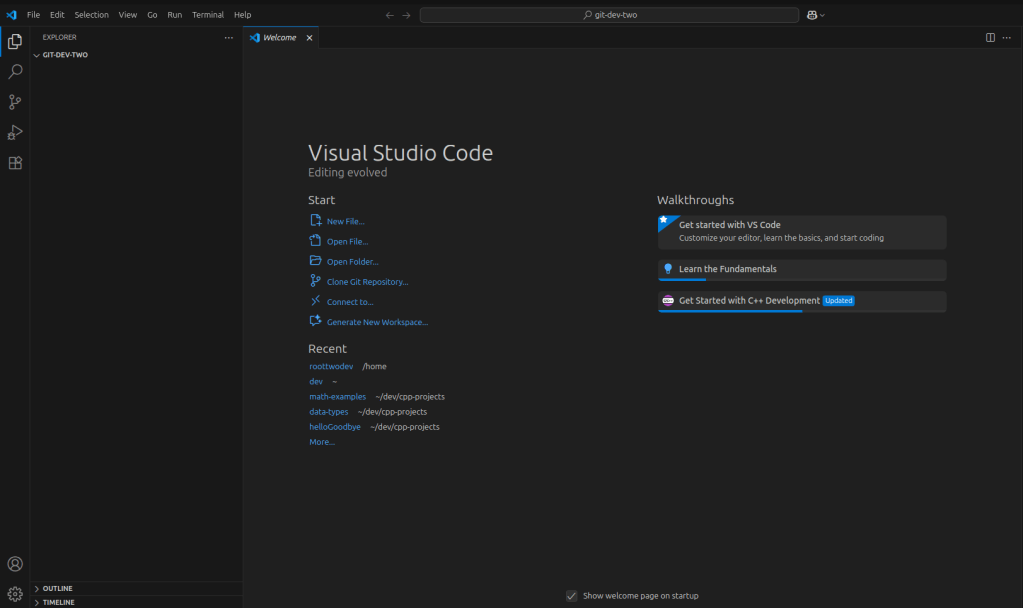
2. Create a project folder by navigating to File > Open Folder
3. This will launch your operating systems file selection GUI. If a folder does not exist for your coding project, right click in your file selection GUI and create a new folder.
4. After the folder is selected and created, select the folder.
The new folder should appear in your explorer window in git
5. When the project folder is open in VSCode type Ctrl+Shift+G to launch the source control panel.
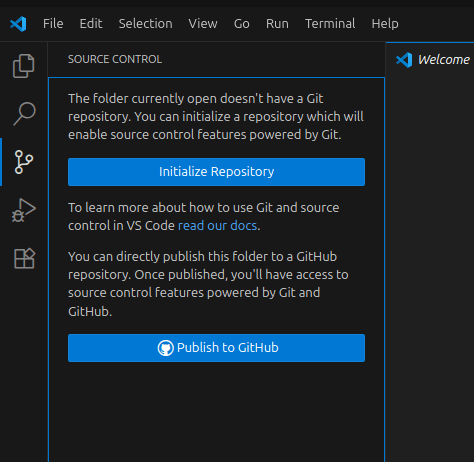
6. After the source control screen is shown select the ‘Initialize Repository’ button to create your repository
From here you will have your first git repository. More instructions are to come in the next blog post on creating your first git commit and showing commit history in both VSCode and via command line.
Conclusion:
This guide explained the background of version control, and git specifically. The guide introduced key features of git and provided base level instructions for installing and configuring git within operating system environment. In addition we introduced the source control window in VSCode as an alternative to manage git projects.
In the next guide we will dig into creating a repository and adding files.
References:
- Getting started with version control: https://git-scm.com/book/en/v2/Getting-Started-About-Version-Control
- Using Git source control in VSCode: https://code.visualstudio.com/docs/sourcecontrol/overview
- Homebrew installation documentation: https://docs.brew.sh/Installation
Mentioned but not directly used:
- Xcode : https://developer.apple.com/xcode/
- VimHero: https://www.vim-hero.com
- Notepad++: https://notepad-plus-plus.org/


Leave a comment